Sunday, May 6, 2012

Altered Frame

Today I have another project to share with you featuring the May Scraps of Elegance kit "Swan Song."

I've been wanting to open an etsy shop and this is the type of thing I think I will add to my inventory. What do you guys think?

I created a shabby chic altered frame using the Tim Holtz Sewing Die, Melissa Frances resins and the beautiful Pink Paislee papers in our SOE kit.

I using the packaging on one of the Pink Paislee products as the background inside the frame. I took apart the Websters Princess Petal flowers and scattered them behind the dress form and buttons.

I added a Prima Pebble behind the little resin frame. That crystral drop was also in our kits and is a Melissa Frances product.

I wrapped some eyelash trim around the bobbin and of course no project of mine is complete without a little punching. ;)

Hope you enjoy! Thank you for taking the time to visit. I appreciate it! xo

Photobucket

Tuesday, May 1, 2012

Scraps of Elegance Design Team Reveal Featuring the April Kit "Swan Song"


This months beautiful kit from Scraps of Elegance features Prima "Fairy Belle,"
Pink Paislee "London Market" and Websters "Everyday Poetry." I can't say enough about the care Mel puts into gathering just the perfect touches for us in these kits. We also have an exclusive "Vintage" add on. This is composed of a select number of vintage items that are very special and a perfect compliment to the kits. 

My first layout for the month is based on Charlottes sketch for us this month.

This photo is of my daughter when she was little. She took dance classes for many years. 
I used my new Martha Stewart Embroidery Punch on this layout. It's beautiful!!!
My favorite Lindy's mist is Gossamer Gold. I love to use it on chipboard when I want to have a bronze antique finish. On this layout I cut the leave flourishes on my Cameo and I used a small script stamp on the leaves. I will be sharing a tutorial in next few days on this technique. Stay tuned.
I used Heartfelt Creations Layered Elegant Swirl Die to create the pretty lacy effect above the photo and off to the side.

My next layout is much more recent photo of my daughter. I used a lot of gesso and a texture paste with a stencil. I have a tutorial I'll be sharing on this technique as well.
I used masking on the cardstock.
The dies are the Fanciful Flourish from Cheery Lynn.
I used a template to cut the scallop edge on the cardboard.

My next layout is one of my daughter when she was a baby along with my niece and nephew.
The leaves on this layout are Heartfelt Creations Autumn Splendor 
I stamped them and fussy cut them out. I also colored them with distress ink.
There are beautiful Melissa Frances pieces in this kit including a chandelier drop. I also used another Martha Stewart Embroidery punch to create the little doilies.

My last layout is of my OTHER daughter! LOL
On this one I used a new set of digital frames I picked up the other day.
They are the Katie Pertlet Carded Stacked Frames from Designer Digitals.
This photo was taken a few years ago by Gina Coppolino Photography.
I used masking in the background again and also on the pattern paper.
I created these daisy floral blooms and am sharing a tutorial with you on how to create these. I also used a crackle stamp on my chipboard Dusty Attic hinge.
I painted them white then stamped over it.
Here is a close up of the flower.

Daisy Flower Tutorial
Supplies needed:  Spellbinders Donna Salazar Carnation Creations Shapeabilities, Small flower punch, Glimmer Mist, Cardstock Colors of Choice, Craft Mat, Chalk Ink, Paint brush
Die cut 2 large flowers and 3 small flowers

Put a few drops of glimmer mist on your craft mat. Spray the water on the glimmer mist. You can test the color on a scrap paper to see how light you like it. Once you get the intensity of color that you like paint your flowers with it. Paint both sides.

    Let them dry or heat dry with your heat gun.
      Ink the petals with chalk ink.

        Roll the daisy flowers petal inward with a paint brush.

        Punch 4 small flowers for the centers.

        Spray them with glimmer mist and let dry.

        Roll the petals inward using the paint brush end.

         Layer the flowers, 2 large, 2 medium and stack the small punched flowers inside each other adhering each layer with glue. Crunch the flower together to fluff it up.

        This month I created some butterfly files for our Scraps of Elegance kit.
        I created these files using free butterfly clip art images and altering the colors and sizes to match "Swan Song." Feel free to grab them for your own personal use.


        Saturday, April 7, 2012

        Today I have another design team project to share using our April kit "Awakenings" by Scraps of Elegance. This kit is so pretty with the beautiful shades of pink, brown and blue. 

        I scrapped this photo of my youngest when she was a baby. I used a cloud texture on the photo to create that background. The one she was in was not very attractive! I added that DA flower branch and dressed it up with different color inks and stickles.
        I rubbed the "rub on" birdcage onto vellum then I cut it out. I also cut up the transparency verse and inked the edges so I could place it how I wanted on my page.
        You know I love my punches. :)

        Hope everyone has a Happy Holiday tomorrow! Thank you for your visit and kind comments.

        Sunday, January 15, 2012

        Scraps of Darkness Design Team Reveal!!!


        It's Reveal Day again, and there is a lot going on at Scraps of Darkness! Before I get started with the reveal of our January kit  I wanted to share some news that we are really excited about.
        We are expecting a new baby! No noone here is pregnant!  As far as I know---but Scraps of Darkness is going to have a new little sister
        On February 1st, we will reveal a new line of kits,
         Scraps of Elegance.
        These kits will be a little different from what you are used to seeing from Scraps of Darkness, and we are honored to have a very talented surprise guest designer who will be helping us to show off our first Scraps of Elegance kit. In addition to that (as if that isn't a lot!), we'll be having a blog hop to kick it all off, so set your calendar's to stop back on February 1, 2012!


        And now on to the SOD reveal!

        Scraps of Darkness January Design Team Reveal!!!

        Introducing "Escape"
        "Searching for my lost shaker of salt" ~Jimmy Buffet


        Be sure to stop by the Scrap of Darkness blog today to see how you can win this months kit!!!

        This months kit is like a breath of fresh air to brighten up those dull grey winter days. Beautiful Graphic 45, Pink Paislee and Authentique papers. This combined with Tim Holtz, Prima, Petaloo and our fabulous "Color Add On" are sure to bring sunshine into your life and chase away the winter blues.

        My first layout is based, as always on our talented artist, Charlottes sketch for us this month.

        Mermaid


        I have a new passion for scrapping images that are not of my kids. My work is more about art and having fun than it is about documenting memories. This mermaid image I purchased from  A Rose Without A Thorn


        I added some sparkle and whimsy to my cut out beach lady with stickles and shells that were included in the kit. I added a piece of acrylic with stamping and embossing. It give it a really cool sea splash look. The pin is one of Mandys always in our kits. I trimmed mine down and topped off the acrylic with it.
        I used a beautiful Dusty Attic Chippee on this that can be found in the Scraps of Darkness Shoppe. I misted the chipboard with Lindys Starburst Mist. We also get an awesome selection of color in the color add on. I also used alcohol inks around the edge of my page to get that water splashed look. The flowers are Heartfelt Creations Stamps.

        Beach Babe

        My next project is an altered canvas. I used the reverse side of a regular stretched canvas purchased at Michaels. This canvas had a wide wood frame on the back. I used my Ranger distress stains to color the wood.
        Here is a close up. I cut the fish out of one of the papers and used black glitter glue and glam to make them special. The blue flowers they are floating on are Inkadoo stamps that I also used stickles on.
        There is a piece of Dusty Attic Chippee covered in acrylic paint and diamond dust. The Sea horse, Starfish and Sandollar were all in the kit!

        This is just a look at the back of the canvas. I used acrylic paint and distress stain on it.

        Postcard

        This is a fun layout I did of my husband and I. We went to Hawaii a REALLY REALLY long time ago! I did a lot of fussy cutting and stamping on this layout.
        Just a few close ups.

        Lifes an Adventure
        This is a photo of my oldest daughter when she was a youngster! I thought I would put the flowers in this kit to work this month. I combined them with some Tim Holtz Tattered florals and some flowers from last months kit.
        The blue die cut vines are a new love from Cheery Lynn designs. The green ferns are a die cut from Heartfelt Creations. I used liquid pearls for my dots around the page edge. I also used stickle on the leaves and flourishes on the frame around the edge.

        I hope you enjoyed this months reveal! Please be sure to stop by Scraps of Darkness to view this wonderful kit and see what the other designers have created this month!

        Wednesday, October 19, 2011

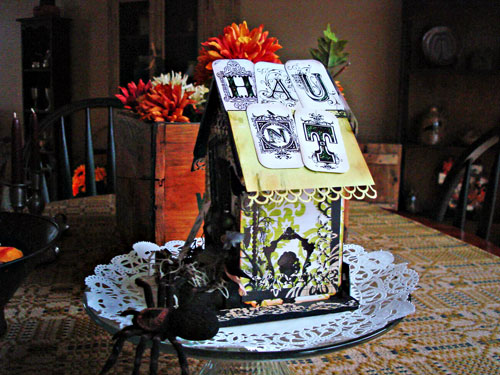
        Phantom House

        We received some of these beautiful Pink Paislee Phantom papers in our "All Hallows Eve" kit this month over at Scraps of Darkness. These papers were part of the coordinating paper add on. This is a new feature Melinda started this month! It's awesome. Since I am such a paper layer girl the more the merrier.

        Pink Paislee is also having a little contest at their site using the Phantom line. I created this "Phantom House"for the occasion.


        I painted the SMC Screen Door in black acrylic and then cover it in glam. I used Mandy's pin off to the side of the door. We also received that moss in one of our past kits.
        This is the back of the house! I cut the word Phantom off the packaging and used it at the base. I took the  chipboard tree and painted it with black acrylic paint dabber and covered it in black glitter.
        I used the letters from the Phantom banner kit and spelled out the word Haunt on the roof.
        On this side of the house I made the paper roses and covered the roof with lots of punched strips!
        I really love these papers! They were so fun to work with.
        Photobucket

        Saturday, January 15, 2011

        ** REVEAL DAY AT SCRAPS OF DARKNESS** Introducing...
            White Magic

         PLUS FULL PSE TUTORIAL ON USING TEXTURES HERE

        Today is the day SCRAPS OF DARKNESS is revealing the GORGEOUS January kit "White Magic!!!!"  I just love the name  (that alone inspires me) never mind all the gorgeous goodies Melinda put together.  This kit is jammed packed with beautiful Pink Paislee Parisian Anthology and Websters Hollywood Vogue! I was able to create 5 layouts and I still have plenty left over for another couple of projects!!!!
        Top that off with some jewels, stars, bling, feathers, flowers and some awesome mists and glimmer glaze!!!! I had such a fabulous time creating with this kit and I know you will too! 


        Each month we have sketch challenge over at Scraps of Darkness. This months sketch by our very talented designer Mandy a/k/a Craftysprinkles does not disappoint!
        Here is my take on Mandy's sketch! I combined the Pink Paislee resist paper with the Websters! I inked my resist with a mossy green distress ink. I love to fussy cut Websters and create a whole new look with their papers. I also love to layer as you can see! We got some beautiful rub on's and jewels in this kit and I think I used every bit of them up! This is a photo of my neice and nephew when they were little. They are teenagers now.
         This next layout is a photo of my girls and I taken by my friend Gina. I altered her original photo in photoshop and I added a snowflake texture to it. I have a full tutorial on how to use textures in PSE here. Check it out so you can try this fun technique yourself!
        Again, I inked my resist paper in the beautiful broken china Distress ink. That gorgeous crystal vine came in the Scraps of Darkness kit along with the yummy white flowers. I cut the vines and flower centers on my cuttlebug using sizzix and TH tattered floral die. I used the Tattered Angel glaze that was this months add mists add on. It gave those blue vines and awesome look. I also added some diamond dust for a icy feel to this wintery layout.

        Lately I have been into cutting my photos up and giving my project a magical fantasy look.
         Again I combined my Pink Paislee and Websters! This kit is so versitile and the papers work so beautifully together!  We received the beautiful flowers, jewels and feathers in the kit! I really adore those Tim Holtz ribbons! Those little bloomers are a wonderful size! You could mist yours to any color you like but I really loved the pop of the white on my layouts!

        There are so many fun things you can do with photos to blend your photos with whatever your vision is for a page. In this next layout I took a photo of my daughter that was taken by my friend Gina and I put it on a magazine cover! If you google "photo fun" you will find a ton of sites where you can upload a photo and print it out on their design. I uploaded my photo, then downloaded it to my computer so I could adjust the colors in my PSE to go with my papers!
         I love purple and this time i used the Websters as a sheet! LOL I did a lot of misting and used the Tattered Angels Stencils that were part of our kit. I also used a ton of rub on's and Mandy's gorgeous stickpin. All part of the amazing "White Magic" kit!


        This final layout is of my Mother and I on my Wedding Day 25 years ago!!!!! 

           Another example of how I combined the Websters and Pink Paislee! I really enjoyed working with all the mists and inking my pages. Those corner pieces are Dusty Attic and are another goodie you'll find in this Magical kit! You can really let your creativity flow with these papers!
        I made the flowers you see on this layout.  I am going to call them "Antique Mums" and will be providing a tutorial on how to do these! Stay tuned...

        I hope I have inspired you to take a hop over to SCRAPS OF DARKNESS 
        and check out the January kit along with what my other fabulous Design Team members have done with it!


        Thank you so much for visiting! I love and appreciate each and every comment!
        Have a wonderful day!

         
        © Living in Color