Before you begin you will need to download a layer mask. PSE does not come with one. I got mine from CoffeeShop . This downloads as an action and you will need to install it as you normally do for actions. Coffeeshop provides a tutorial on how to load actions if you are unfamiliar with this process.
1. Open you photo in pse and create a copy of your background.


3. Click on your layer mask in your Effects aka Actions thumbnail located on the right side of your screen and drag and drop it onto your background copy image showing on your main screen.


- You can see the layer mask attached to your background copy photo in your layer palette. It is showing up as a white box. Your Foreground and Background colors are showing up in the boxes located on the lower left side of your screen as white and black. ( If you have another color showing up there click on the colored box. A color palette will open and choose white and or black. These are the colors you need to work with)
- Now click that little rounded arrow where those foreground and background colors are so they will reverse and the black will be on top and white on the bottom.

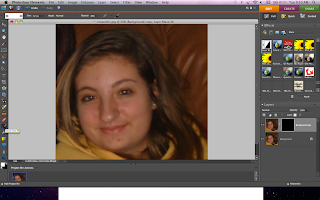
4. Now click on your paint bucket tool located on the left in your tool bar. When you click on it the paint in the bucket will be black. Dump the paint bucket (click) on your photo in the main screen.
The photo should clear up and show your original without a blur and your mask connected to your background copy on the right side of your screen should be black..
5. Now click on your little rounded arrow again where your foreground and background colors are. This will reverse them and the white will be on top. ( If you click on the color and not the arrow it will bring up the color palatte again and you don't want that.)
6. Click on your black layer mask on the right side of your screen so it is highlighted with a white box.
7. Choose your brush a soft round brush and for this I used a size of about 23 pixals, normal mode and the opacity I change as I am brushing. Start at about 30% if it's too much use less, like 25%, if it's not enough (and you will be able to tell because the blemishes will still be visible) then up it to 35 -40 etc. until you get the look you like. Just use your brush over the face avoiding the eyes, eyebrows, ears, mouth and nostrils.
*** VERY IMPORTANT - YOU ARE USING A WHITE BRUSH ON YOUR BLACK LAYER MASK. THE COLOR BRUSH IS DETERMINED BY THAT TOP BOX YOUR FOREGROUND. MAKE SURE THE BLACK MASK IS WHAT IS HIGHLIGHTED NOT YOUR BACKGOUND LAYER JUST THE MASK OR THIS WON'T WORK!!!***
You're mask will look like this when you are done with it.

9. You can save and scrap as is OR you can add some fun stuff, like texture, borders and brushes.
- Here I used the dodge tool to brighten the hightlights in her hair, added a brick wall texture, I used a brush for the eyelashes and another brush for the grunge border frame! I also used Lisa aka StarSailor Scrappers tutorial on enhancing eyes for that beautiful glimmer. (Thanks Lisa!)